

Video files can become surprisingly large. A short recording from a phone, screen capture, or gaming session may take up hundreds of megabytes, even when it looks ordinary during playback. This happens because video contains a large amount of visual information. Every frame includes details about colors, movement, textures, lighting, and sound.
Compression makes video files smaller by reducing the amount of data needed to store and transmit them. The process can be simple for users, but several technical ideas determine the final result. Codecs, bitrate, resolution, frame rate, and file format all influence how large a video becomes and how clear it looks.
Understanding these terms makes it easier to choose the right settings for messaging apps, websites, social media, and cloud storage. If you need to prepare a video for Discord, you can use the best video compressor for discord to reduce file size before uploading. The right tool can help you meet an upload limit while keeping the video clear enough to watch.
Why Uncompressed Video Is So Large
A digital video is made from a series of still images called frames. Each frame contains pixels, and every pixel stores color information. A high-resolution video may contain millions of pixels in every frame.
Consider a video with:
- 1920 × 1080 resolution
- 30 frames per second
- 24-bit color
That video contains more than two million pixels per frame and thirty frames every second. If every frame were stored separately without compression, the file would become enormous within a few minutes. Audio would add even more data.
Most video files are therefore compressed. Compression removes repeated or less noticeable information so the file requires less storage space.
What Is a Codec?
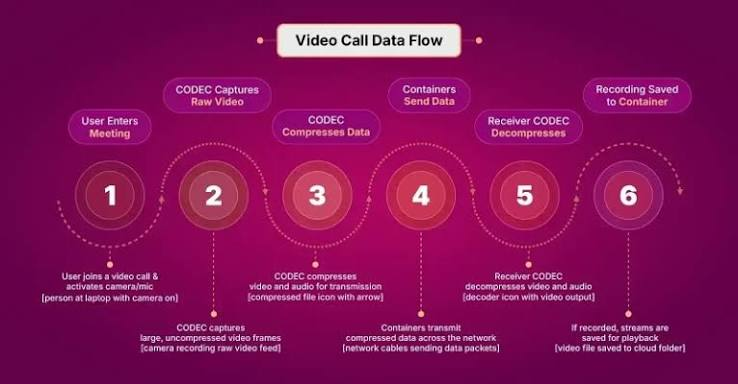
A codec is a system used to encode and decode video. The word combines “coder” and “decoder.” When a video is exported, the codec encodes the visual and audio information into a format that takes less space. When the video is played, a media player decodes that information so you can watch it.
Common video codecs include:
- H.264
- H.265, also called HEVC
- VP9
- AV1
- Apple ProRes, often used for editing and production
H.264 remains widely supported because it offers a useful balance between quality, file size, and compatibility. It works on most phones, computers, browsers, and messaging services.
H.265 can deliver similar visual quality at a smaller file size, but it may require more processing power and may not work equally well on every device.
VP9 is commonly associated with web video, while AV1 is a newer codec designed to improve compression efficiency. AV1 can produce smaller files at similar quality, although encoding may take longer and older devices may not support it smoothly.
A codec does not determine everything about a video. The bitrate, resolution, frame rate, and encoding settings also affect the final result.
Containers and File Extensions
A video codec is different from a container. The container is the file structure that holds the video stream, audio stream, subtitles, metadata, and sometimes additional information.
Common containers include:
- MP4
- MOV
- MKV
- WebM
An MP4 file may contain H.264 video and AAC audio. A WebM file may contain VP9 or AV1 video with an Opus audio track. The file extension tells you about the container, but not always the exact codecs inside it.
For general sharing, MP4 is often a practical choice because it is supported by many devices and platforms. A professional editing workflow may use MOV or another format that preserves more information.
Lossy and Lossless Compression
There are two broad types of compression: lossy and lossless.
Lossy Compression
Lossy compression removes some information permanently. It is designed to eliminate details that viewers are less likely to notice. Most online videos, phone recordings, and social media files use lossy compression.
The advantage is a much smaller file. The tradeoff is that excessive compression can create visible problems such as:
- Blocky areas
- Blurry motion
- Color banding
- Soft details
- Noise around text
- Reduced sharpness
Lossless Compression
Lossless compression preserves all original information. When the file is decoded, it can reproduce the original data exactly. This is useful for professional editing, archiving, scientific work, and situations where every detail matters.
Lossless files are much larger than typical delivery files. For casual sharing, they are usually unnecessary. A common workflow is to keep a high-quality master file and create a compressed copy for distribution.
What Is Bitrate?
Bitrate is the amount of data used to represent each second of video. It is usually measured in kilobits per second, or Kbps, and megabits per second, or Mbps.
A higher bitrate generally allows more detail to be preserved. A lower bitrate produces a smaller file but may make the image look less clear.
For example, two videos can have the same resolution and length but different file sizes because one uses a higher bitrate. The higher-bitrate version may show cleaner movement, more detailed textures, and fewer compression artifacts.
Bitrate is not the same as quality in every situation. A modern codec may produce better results at a lower bitrate than an older codec. The content also matters. A quiet interview with a mostly still background can look good at a lower bitrate, while a fast sports clip may need more data.
Constant and Variable Bitrate
Encoders commonly use constant bitrate or variable bitrate settings.
Constant bitrate, or CBR, uses approximately the same amount of data throughout the video. This can make file size more predictable and may be useful for live streaming or systems with strict bandwidth requirements.
Variable bitrate, or VBR, adjusts the amount of data according to the complexity of each scene. A simple still image receives less data, while a busy action scene receives more. VBR often provides better overall quality at a similar average file size.
Some encoders offer one-pass and two-pass VBR. A two-pass process analyzes the video first, then distributes data more efficiently during the second pass. It may improve consistency, but it takes longer.
How Resolution Affects File Size
Resolution describes the number of pixels in each frame. Common examples include:
- 480p
- 720p
- 1080p
- 1440p
- 4K
Higher resolution can show more detail, but it also requires more data. A 4K video has many more pixels than a 1080p video, so it usually creates a larger file.
The best resolution depends on the final viewing situation. A 720p video may be enough for a short Discord clip viewed on a phone. A 1080p export may be better for tutorials, product demonstrations, and videos containing small text.
Keeping a 4K master can be useful for future editing, but uploading a 4K file to a chat application may be unnecessary if viewers will watch it on small screens.
How Frame Rate Affects File Size
Frame rate is the number of frames displayed every second. Common settings include 24, 30, and 60 frames per second.
A higher frame rate makes motion appear smoother, but it also means the encoder must process more frames. A 60 fps video can be significantly larger than a 30 fps video with the same resolution and duration.
Use 60 fps when smooth movement is important, such as gaming, sports, or fast camera movement. For interviews, tutorials, travel clips, and ordinary conversations, 24 or 30 fps is often sufficient.
Reducing frame rate is one way to shrink a file, but it should be done carefully. Fast motion may look less smooth after conversion.
How Duration Determines File Size
Longer videos usually create larger files because they contain more seconds of visual and audio information. If all other settings remain the same, doubling the duration will roughly double the file size.
Trimming a video is therefore one of the simplest ways to reduce its size. Remove introductions, pauses, mistakes, loading screens, and empty sections before changing technical settings.
A short, focused clip is often more useful than a long recording. It uploads faster, uses less storage, and is easier for the viewer to watch.
Audio Also Uses Space
Video usually receives most of the attention, but audio contributes to file size as well. High-quality stereo audio uses more data than low-bitrate mono audio.
For spoken content, a moderate audio bitrate is often enough. Music and detailed sound effects may benefit from higher quality. If the audio is difficult to understand, reducing video quality will not solve the main problem.
When compressing a video, listen to the final file with headphones or speakers. Check for missing dialogue, distortion, sudden volume changes, or background noise.
Choosing Settings for Discord
Chat platforms often have strict file limits. Discord’s current Help Center states that non-Nitro users can upload files up to 20 MB, Nitro Basic supports uploads up to 50 MB, and Nitro supports uploads up to 1 GB. Discord also notes that it may test different limits for selected users.
To prepare a video for a free account, create a file comfortably below 20 MB. Do not aim for exactly the limit because file size calculations and account conditions can vary.
A practical Discord workflow is:
- Trim the clip.
- Choose MP4 with H.264 video.
- Use 720p or 1080p depending on detail.
- Select 24 or 30 fps.
- Use a moderate bitrate.
- Export and check the file size.
- Preview the final video before uploading.
If the file is still too large, lower the resolution or bitrate gradually. If quality becomes unacceptable, upload the original to cloud storage and share a link instead.
Why a Video Can Look Bad After Compression
Compression problems usually occur when too much information is removed. A very low bitrate may create blocks around moving objects, make faces look soft, or damage small text.
Some scenes are more difficult to compress than others. Water, smoke, leaves, crowds, and fast camera movement contain complex patterns that change from frame to frame. These scenes need more data than a static presentation slide.
If a video looks poor, try improving the settings in this order:
- Make sure the source file is not already heavily compressed.
- Use a modern codec if the destination supports it.
- Increase the bitrate slightly.
- Reduce the resolution only if necessary.
- Remove unnecessary sections.
- Avoid compressing the same file repeatedly.
Always compare the compressed file with the original at normal viewing size. The goal is not to preserve every pixel, but to keep the details that matter to the viewer.
Practical Compression Examples
A short talking-head video may work well at 720p, 30 fps, H.264, and a moderate bitrate. Since the background changes very little, the encoder can preserve a clear face and voice without producing a large file.
A game highlight may need 1080p and a higher bitrate because the screen changes quickly. If the file exceeds the upload limit, trim the clip first, then reduce the frame rate or resolution.
A tutorial showing small text may need 1080p even if the video is short. In this case, reducing the bitrate too far may make the instructions unreadable. A cloud link may be better than forcing the video into a very small attachment.
Final Thoughts
Video compression is a balance between quality, compatibility, and file size. Codecs decide how visual information is stored, bitrate controls how much data is used each second, and resolution, frame rate, duration, and audio settings influence the final result.
For everyday sharing, start with a widely supported format such as MP4 with H.264 video. Trim unnecessary content, choose a sensible resolution, and adjust bitrate gradually. For Discord, create a file below the applicable upload limit or use a link when the original quality must be preserved.
Once you understand the basic relationship between codecs, bitrate, and file size, compression becomes much easier. You can create smaller videos that upload faster, use less storage, and still look clear enough for the people watching them.
