

You’ve got the designs. Maybe a few sample pieces, a lookbook, even a name for the brand. Then you open WooCommerce for the first time and wonder why nobody told you there’d be fifteen settings screens between you and your first sale.
Relax. WooCommerce is built for business owners, not developers. Apparel does bring a few quirks of its own: sizes, colours, returns, and customers who want to know exactly when their order lands.
This guide explains how to set up a WooCommerce clothing store, from choosing a theme and adding products to configuring payments, shipping, and other essential store settings.
Start With the Foundation
WooCommerce runs on WordPress, so you need a live WordPress site first. That means a domain name, an SSL certificate (most hosts include one for free), and a hosting plan running a current PHP version.
Fashion stores are image-heavy, and slow product pages cost sales. Pick a host that handles image-heavy sites well. Managed WordPress hosts like Cloudways or Kinsta are popular, and they take most of the technical work off your plate.
Install WooCommerce and Run the Setup Wizard
From your WordPress dashboard, go to Plugins → Add New Plugin, search for WooCommerce, then click Install Now and Activate.
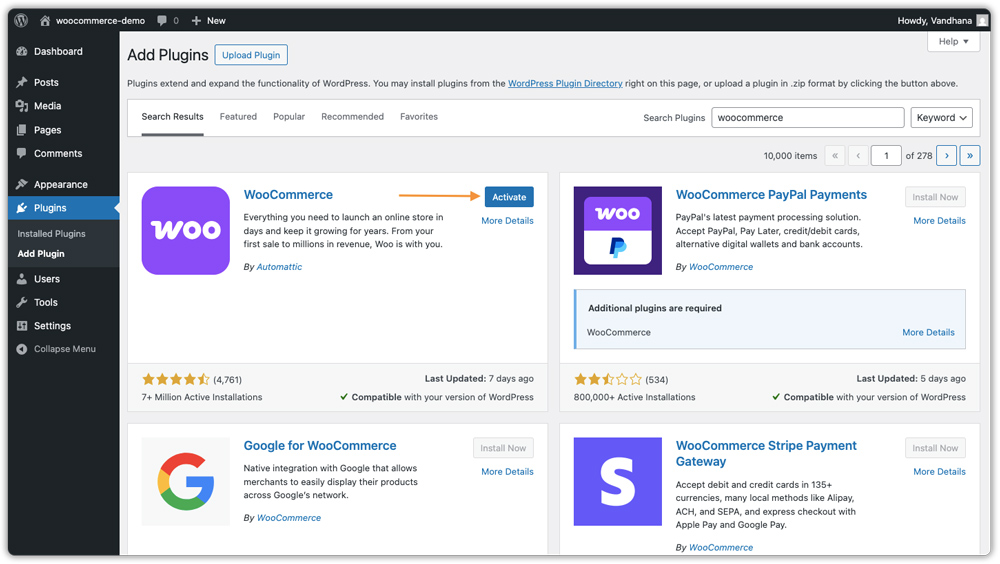
A short wizard starts automatically. It asks about your business stage, product type, store location, and email. Choose physical products, and skip the optional extras like Jetpack and Mailchimp. You can add them later.
It takes about three minutes, and you land on the WooCommerce Home screen, a checklist of what’s left to configure. Treat it as your launch to-do list.
Choose a WooCommerce Theme and Design Your Storefront
Your theme determines how customers browse your clothing store, view product images, and navigate between pages. Choose a WooCommerce-compatible theme that works well on mobile devices and gives your products enough space to stand out.
Before selecting a theme, consider these factors:
- Mobile-friendly design: Make sure product pages, menus, and checkout work smoothly on smartphones.
- Product display: Look for clean product grids, image galleries, and layouts that suit apparel photography.
- Customisation options: Choose a theme that lets you adjust colours, fonts, headers, and page layouts to match your brand.
- Performance: Avoid unnecessary animations and design elements that slow down product pages.
- WooCommerce compatibility: Check that the theme supports the product and checkout features your store needs.
Once you’ve selected a theme, customise your homepage with your logo, brand colours, featured collections, new arrivals, and best-selling products. Keep the navigation simple so customers can quickly find what they’re looking for.
You don’t need an elaborate design to launch. Focus on clear product information, easy navigation, and a straightforward checkout experience.
Configure the Settings That Matter for Apparel
Go to WooCommerce → Settings. This is the control room of your store, so a few careful minutes now save headaches later.
- General: Add your store address, choose where you’ll sell and ship, and set your currency.
- Products: Set weight and dimension units, turn on reviews (social proof matters in fashion), and enable stock management with low-stock alerts, so your bestselling size M doesn’t quietly sell out.
- Taxes: Turn on tax calculation and decide whether prices include tax. Some regions tax clothing differently from other goods, so check the rules for where you sell.
- Shipping: Set up zones and methods (more on this below).
- Payments: Choose how customers pay.
- Accounts & Privacy: Allow guest checkout or require accounts. Guest checkout usually means less friction for first-time buyers.
- Emails: Customise order and refund emails with your logo and brand voice. For a clothing brand, these emails are part of the experience.
The remaining tabs (Integration, Site Visibility, Point of Sale, Advanced) can wait. One tip: keep Site Visibility on “coming soon” until your catalogue is ready.
Organise Products Into Categories and Build Easy Navigation
As your clothing catalogue grows, organising products into categories helps customers find the right items without browsing your entire store.
Start by creating categories that reflect the products you sell. For example, a clothing store might use:
- Clothing: Shirts, T-shirts, trousers, dresses, and hoodies.
- Collections: New arrivals, seasonal collections, and bestsellers.
- Accessories: Bags, caps, belts, and other complementary products.
To create a category, go to Products → Categories in your WordPress dashboard. Enter the category name, add a description if needed, and save it. You can then assign products to the appropriate categories from the product editor.
Next, organise these categories in your main navigation menu. Keep the menu concise and use clear labels so customers can reach the products they want in just a few clicks.
You can also use product attributes such as size and colour to help shoppers narrow down their choices. If your catalogue contains many products, consider adding filters for price, size, colour, and availability using your theme or a compatible filtering extension.
A well-organised catalogue makes browsing easier and helps customers discover products they might otherwise miss.
How to Add Clothing Products in WooCommerce (Variable Products Explained)
Go to Products → Add New. This is where your catalogue lives.
Write a clear product title and description that explain the benefits to customers. For example, instead of just saying “Relaxed-fit linen shirt,” highlight how the shirt keeps customers cool in warm weather and works for both casual outings and dinners. Add a main product image and a gallery showing the front, back, fabric details, and a model wearing the product, if available.
Next, select the product type under Product Data:
- Simple product: A product with one price and no variations, such as a tote bag or cap.
- Variable product: A product with multiple options, such as a T-shirt available in different sizes and colours. Each variation can have its own price, SKU, and stock level.
- Virtual product: A non-physical offering, such as a styling consultation.
- Downloadable product: A digital item, such as a sewing pattern or style guide.
Choose the product type that best matches what you’re selling.
| Product | Product type | Attributes |
| Linen shirt | Variable | Size, Colour |
| Relaxed tee | Variable | Size, Colour |
| Canvas tote | Simple | None |
| Embroidered hoodie | Variable | Size, Colour (custom text added with an add-on) |
For a variable product, open the Attributes tab and add Size and Colour. Tick “Used for variations,” then generate your variations and set stock for each one. Add weight and dimensions for every physical item, because shipping rates depend on them.
Want the page to do more selling? PluginHive’s guide on customising the WooCommerce product page shows how to go beyond a title, price, and Add to Cart button. And if you want different details for each size or colour, see how to add custom fields to WooCommerce product variations.
Selling Custom or Personalised Pieces?
Monogrammed hoodies, custom-printed tees, and embroidered names all require extra customer input. The PH Product Add-ons for WooCommerce plugin lets you add custom options to your product pages so that customers can enter their details before checkout.
Add a Size Chart (and Cut Returns Before They Start)
A clear size guide helps customers choose the right fit and reduces confusion when shopping online. It can also help minimise returns caused by ordering the wrong size.
A good size chart should include:
- Garment measurements: Chest, length, and shoulder measurements rather than just S, M, and L.
- Centimetres and inches: Include both units if you sell internationally.
- Fit notes: Explain how the garment fits, such as “Relaxed fit; size down for a closer fit.”
- Model details: Mention the model’s height and the size they’re wearing, if applicable.
Use actual garment measurements to create your size chart so customers can make informed purchasing decisions.
| Size | Chest (cm) | Length (cm) |
| S | 100 | 72 |
| M | 106 | 74 |
| L | 112 | 76 |
| XL | 118 | 78 |
Where to put it: add the table to the product description or a dedicated tab. If you have dozens of products, build one “Size Guide” page and link to it from each product, so you update measurements in one place. Some themes and plugins add size-chart tabs for you, so check what yours offers before building from scratch.
Photograph Your Clothing So It Sells
Customers can’t touch the fabric, so your photos have to do that job. Good clothing photos answer three questions: how does it look, how does it fit, and what is it made of?
- Shoot more than the front. Add a back view, a close-up of the fabric or stitching, and at least one on-model shot.
- Stay consistent. Use the same background, lighting, and image dimensions across the catalogue, so your shop page looks tidy.
- Give every colour its own image. In a variable product, each variation can have its own photo, so the image changes when the shopper picks a colour.
- Compress before uploading. Large files slow product pages, and slow pages lose sales. WebP or well-optimised JPEG files keep things quick.
- Name files and write alt text properly. A file called navy-linen-shirt-front.jpg with the alt text “Navy linen shirt, front view” helps accessibility and image search.
Set Up Basic SEO for Your Clothing Store
Once your products and categories are in place, optimise your store so potential customers can discover them through search engines.
Start with the following steps:
- Use descriptive product titles: Include the product type and relevant details, such as colour or material, where appropriate.
- Write unique product descriptions: Explain the fabric, fit, available sizes, care instructions, and key benefits instead of copying descriptions from suppliers.
- Optimise category pages: Add useful descriptions to major categories, such as linen shirts or casual T-shirts, where they help customers understand the collection.
- Optimise product images: Use descriptive file names and meaningful alt text, and compress images to help maintain page speed.
- Create readable URLs: Use short, descriptive product and category URLs that reflect the page content.
- Add internal links: Link relevant products to their categories and connect useful buying guides to the products they discuss.
You can use an SEO plugin to manage page titles, meta descriptions, XML sitemaps, and other optimisation settings. After launching, connect your website to Google Search Console to monitor indexing and search performance.
Also check that your product pages provide accurate structured product information. Depending on the page and its eligibility, this can help search engines understand details such as price, availability, and product ratings.
SEO takes time, so focus first on accurate product information, useful category pages, and a website that customers can navigate easily
Start Accepting Payments in Your Clothing Store
Go to WooCommerce → Settings → Payments. Bank Transfer and Cash on Delivery are available out of the box, but most shoppers expect to pay by card or wallet.
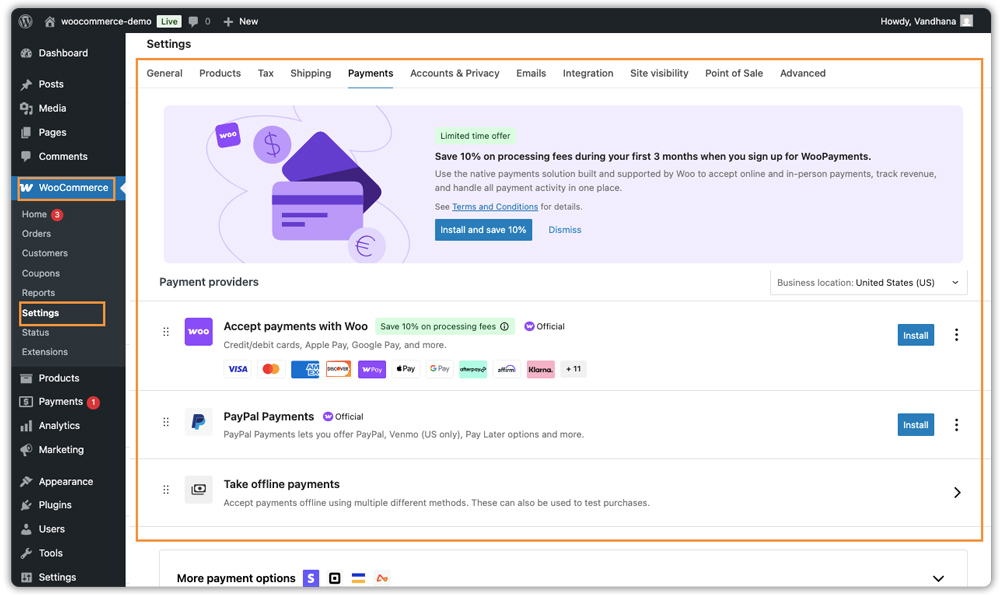
- WooPayments: Built into WooCommerce and easy to set up. Supports cards, Apple Pay, and Google Pay.
- Stripe: A good fit if you plan to offer subscriptions, like a monthly basics box.
- PayPal: Familiar and trusted, which helps with first-time buyers.
Pick one, click Set up, and connect your account. For fashion, mobile wallets are worth enabling, since a lot of clothing shopping happens on phones.
Set Up Shipping (Where Apparel Stores Win or Lose)
Go to WooCommerce → Settings → Shipping.
WooCommerce uses Shipping Zones to show different options by location. Click Add Zone, name it, choose the regions, and add a method:
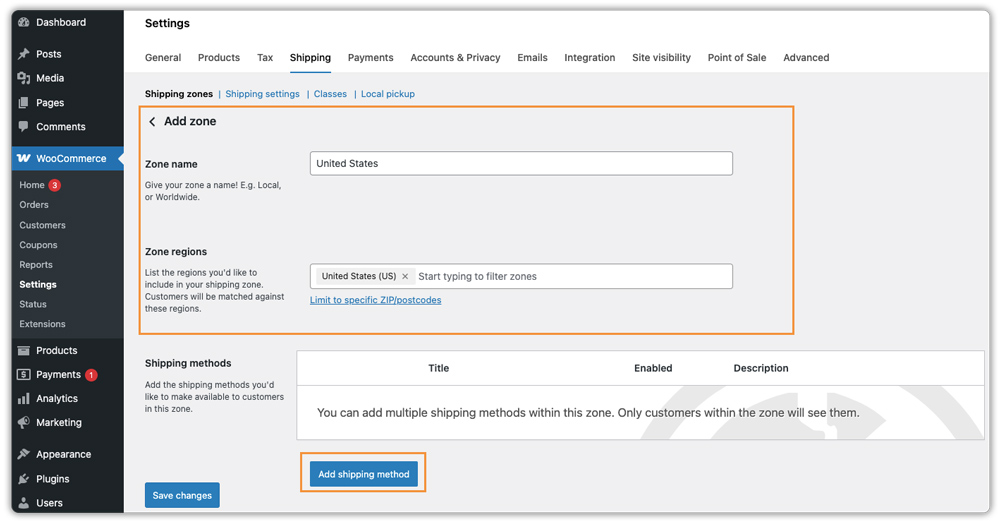
- Flat Rate: A fixed fee per order.
- Free Shipping: Free above a minimum order value. This is a proven way to lift average order size, since a shopper with one tee in the cart will often add a second to hit the threshold.
- Local Pickup: Let customers collect from your studio or store.
This is enough to launch. But apparel customers compare shipping costs before they commit, and WooCommerce’s default setup has limits. It doesn’t connect to carriers, show live rates, print labels, or send tracking updates on its own. That means a lot of manual work once orders pick up.
PluginHive’s WooCommerce shipping plugins can automate this. For US stores:
- FedEx Shipping Plugin for WooCommerce with Print Label
- UPS Shipping Plugin for WooCommerce with Print Label
- PH USPS Shipping Plugin for WooCommerce with Print Label
If you use more than one carrier, say USPS for lightweight tees and UPS for bulkier jackets, the Multi-Carrier Shipping Plugin for WooCommerce lets customers compare rates and choose at checkout.
A few more plugins help with common apparel problems:
- Set delivery expectations: An Estimated Delivery Date plugin shows customers when to expect their order. This matters when someone is buying for an event or a trip.
- Keep customers informed: Shipment Tracking Pro cuts down on “where is my order?” emails.
Manage Orders and Returns Like a Pro
Everything lives under WooCommerce → Orders. Each order has a status (Pending, Processing, Completed, Refunded), and you can open any order to edit details, add notes, resend emails, or process a refund.
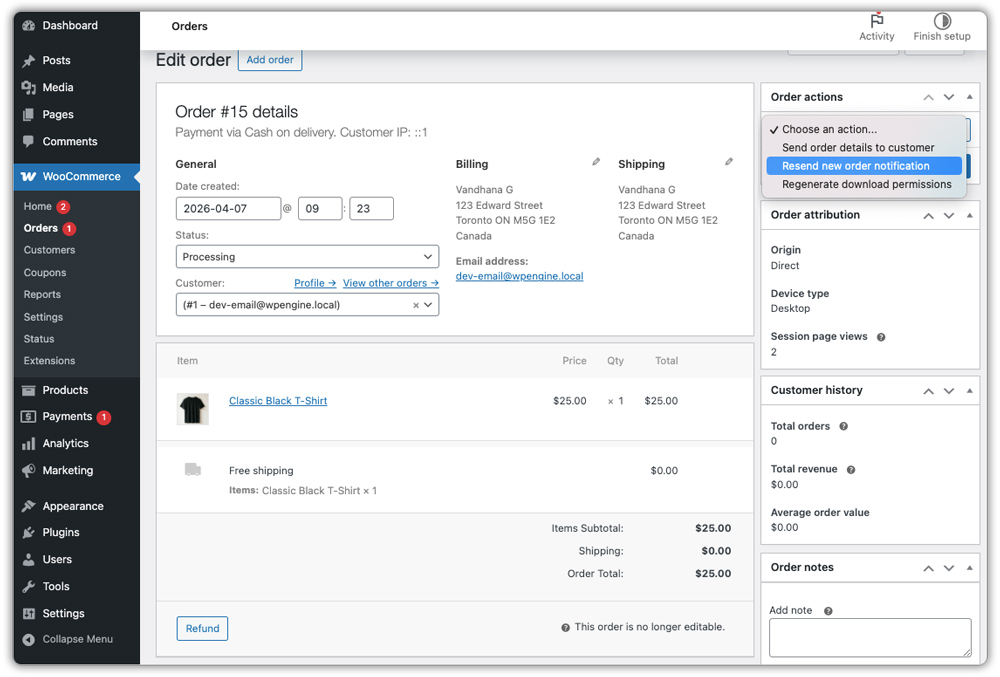
Fit is hard to judge online, so returns are a normal part of selling clothing, and you’ll use that refund button often. A good size chart and honest photos reduce returns, and a clear policy keeps the rest from turning into disputes.
Build a Returns Policy That Protects Your Margin
Decide these points before launch, and write them in plain language:
- Return window: How many days after delivery customers can send items back.
- Condition: For example, unworn, with tags attached and in original packaging.
- Return shipping: Who pays, and whether that depends on the reason for the return.
- Exchange, refund, or store credit: Which one you offer by default.
- How to start a return: An email address, a form, or a returns page.
Publish the policy on its own page and link it from your footer, product pages, and checkout. When an item comes back, open the order and use the refund option. WooCommerce lets you restock the returned items there, so your inventory stays accurate.
As orders grow, use Bulk Actions to update many orders at once. WooCommerce’s High-Performance Order Storage (HPOS) keeps the orders page fast even with thousands of orders. During sale seasons, you’ll be glad it’s there.
And the sale doesn’t end at checkout. How you handle delivery, communication, and follow-up decides whether a first-time buyer comes back. PluginHive’s guide to improving the post-purchase experience in WooCommerce is a good next read.
Offer Fittings and Styling Appointments
Not every apparel sale happens through a cart. If you run a boutique, a tailoring service, or a bridal and occasion-wear studio, appointments are part of the business: fittings, made-to-measure consultations, personal styling sessions.
The Bookings and Appointments for WooCommerce plugin turns a product into a bookable service. Customers pick a date and time slot and get an automatic confirmation, with no back-and-forth messages. It also supports multiple staff members, buffer time between bookings and calendar sync with Google Calendar, Outlook, and iCalendar.
Secure Your Store and Plan Regular Backups
Before accepting orders, make sure your WooCommerce store has basic security and maintenance measures in place. A secure, well-maintained website helps protect customer information and reduces the risk of avoidable downtime.
Follow these practices:
- Keep software updated: Regularly update WordPress, WooCommerce, your theme, and installed plugins.
- Use strong administrator passwords: Enable two-factor authentication where available and limit administrator access to people who need it.
- Schedule regular backups: Back up your website files and database, and keep copies somewhere separate from your live hosting environment.
- Use trusted extensions: Install themes and plugins from reputable sources, and remove anything you no longer use.
- Monitor website activity: Use appropriate security tools to help detect suspicious login attempts and other potential issues.
- Test important changes: When possible, use a staging site to test updates and configuration changes before applying them to your live store.
Don’t rely on an SSL certificate alone to protect your website. Security also depends on updates, access controls, backups, and ongoing maintenance.
Promote Your Store and Encourage Repeat Purchases
Launching your store is only the first step. You’ll also need to help customers discover your products and give them reasons to return.
Start with a few practical activities:
- Promote new collections: Share product photos, styling ideas, and new arrivals through relevant social media channels.
- Collect customer reviews: Encourage customers to share honest feedback about product quality, fit, and their shopping experience.
- Offer relevant promotions: Use introductory discounts, seasonal offers, or free-shipping thresholds where they make financial sense.
- Build an email list: With appropriate consent, send updates about new collections, restocks, and promotions.
- Recover abandoned carts: Consider a compatible solution that reminds customers about products they added to their carts but didn’t purchase.
- Review store performance: Track sales, conversion rates, popular products, and returns to identify where improvements are needed.
You don’t need to implement every marketing tool immediately. Start with the activities that suit your audience and budget, then expand as you learn what works.
Test Your Clothing Store Before Launch
Before making your store publicly available, run through a complete test purchase. This helps identify problems with product variations, payments, shipping, and order notifications before real customers encounter them.
Use this checklist:
- Test product variations: Select different sizes and colours and confirm that the correct price, image, and availability appear.
- Check inventory: Verify that stock quantities update correctly after an order and that unavailable variations cannot be purchased when they are out of stock.
- Test the cart and checkout: Add products to the cart, change quantities, apply a coupon if available, and complete the checkout process.
- Verify payment processing: Follow your payment provider’s recommended test procedure to check successful and unsuccessful transactions.
- Check shipping methods: Confirm that the correct shipping options and charges appear for the locations you serve.
- Review order emails: Make sure customers receive the expected order confirmation and status notifications.
- Check mobile usability: Test product pages, menus, cart, and checkout on a smartphone as well as a desktop.
- Review policies and contact details: Confirm that your returns policy, shipping information, privacy policy, and contact details are accessible and accurate.
- Check website performance: Make sure product images load properly and important pages respond quickly.
Once everything works as expected, remove the coming-soon restriction, confirm that search engines can access the pages you want indexed, and announce your launch.
Your Launch Checklist
The core setup is simpler than it looks. Start by installing WooCommerce, configuring the store settings, adding products with sizes and colours, publishing a size chart and returns policy, setting up payments and shipping, and launching your store.
As your business grows, you can add plugins based on your needs. Shipping plugins can help manage deliveries, product add-ons can support personalisation, and booking plugins can help you offer fitting appointments. Choose the tools that suit your store instead of adding everything at once.
Ready to get started? Explore PluginHive’s WooCommerce plugins and find the ones that fit your store’s needs.
WooCommerce Clothing Store FAQs
- How much does it cost to set up a WooCommerce clothing store?
The WooCommerce plugin itself is free. Your costs come from hosting, a domain, a theme if you want a paid one, payment processing fees, and any plugins you add, such as shipping or booking tools.
- Can I sell clothing in different sizes and colours?
Yes. Use variable products. You add Size and Colour as attributes, generate the variations, and set price, stock, and image for each one.
- Do I need a developer to launch an apparel store?
No. The setup wizard, product editor, and settings screens cover the basics. A developer only helps if you want custom design work.
- How do I reduce returns on a WooCommerce clothing store?
Publish a detailed size chart, show every colour and angle in your photos, and describe the fit honestly. A clear returns policy also helps, because customers know what to expect.
- Can I take bookings for fittings or styling sessions?
Yes. A bookings plugin lets customers pick a date and time slot, as covered in the Bookings and Appointments for WooCommerce section above.
