


Install macOS 27 Beta Safely Without Putting Your Mac Data at Risk.
With its new Apple Intelligence tools, refreshed Liquid Glass design, and overall platform upgrades, there’s a lot of temptation to try out macOS 27 Golden Gate early. For anyone paying close attention to Apple, it’s exciting to get a first look at Siri AI and the redesigned system apps. Beta software never comes without a catch, and macOS 27 is no exception. At this point, there are real risks of app conflicts, installation errors, unexpected reboots, and files becoming suddenly inaccessible. That doesn’t mean you should skip the beta entirely, though caution is more important than usual here.
This guide walks you through a solid backup, test, and recovery plan so you can try out macOS 27 without gambling your files. Along the way, we’ll also cover what to do if you need to recover Mac data after installation.
Is macOS 27 Beta Right for Your Mac
macOS 27 remains in beta with Apple continuing to push out beta builds through summer 2026. The company has confirmed that it will be made available to the public in the fall of 2026, so the current version is still being refined. If you like to try out new features early and report bugs, the beta is for you.
Developers, experienced testers, and anyone with access to a secondary Mac are the best option for a safe spin. If your Mac is doing schoolwork, client projects, or files you can’t afford to lose, it’s the smarter move to wait. The Apple Beta Software Program allows members to test pre-release versions of macOS and send structured feedback. That program is useful, but it doesn’t promise a seamless experience on every device. Before you decide to install anything unfinished, weigh how much you rely on your Mac daily.
Use the Beta Readiness Check Before You Install
A quick readiness check can save you a stressful afternoon down the line. Before installing macOS 27, make sure your Mac model is supported in Software Update. Some people skip this step and try to update their hardware, which it really can’t handle. Next, do a full Time Machine backup to an external drive. The backup protects your applications, photos, documents, and email.
If you have any active projects, copy them to a second location as well; this will speed up recovery if something goes wrong later. Make sure that apps, plugins, and drivers you use every day are known to work with macOS 27. Checking compatibility beforehand prevents an annoying workflow interruption right after installation. And finally, have a separate pre-beta backup ready to go in case you need to roll back to an earlier macOS version. Each of these steps takes only a few minutes, but together they form a real safety net.
| Checkpoint | What to Do Before Installation | Why It Matters |
| Mac compatibility | Review software updates and supported models | Prevents attempting an unavailable update |
| Full backup | Create a Time Machine backup on external storage | Protects files, apps, photos, and documents |
| Priority files | Copy current projects to a second location | Enables faster recovery of essential data |
| App compatibility | Check critical apps, plugins, and drivers | Reduces workflow interruptions |
| Rollback plan | Keep a pre-beta backup available | Supports a return to an earlier macOS version |
Back Up Your Mac Before Joining the macOS 27 Beta
Backup preparation should be the primary safety step in this entire process, not an afterthought. Time Machine automatically backs up your applications, music, photos, email, documents, and most other personal files.
Before you enroll, run through this short checklist:
- Confirm the backup completed. Don’t assume that because the process ran in the background without error that it succeeded.
- Double-check for silent failures. A broken backup gives you a false sense of security when you need real protection.
- Make a second copy of irreplaceable items to another drive, such as client projects or a full Photos library.
- Don’t forget Desktop folders. They usually have more important files than you think, so make sure you include them in your extra copy too.
This layered approach means that even if the beta causes trouble, your files aren’t in a single, fragile place. Good Mac data recovery begins before it goes wrong, not after.
How to Install macOS 27 Beta
Step 1: Join the Apple Beta Software Program
- This program is for people who really want to test unfinished software and report any issues they find.
- Sign in with your Apple Account to Apple’s beta program and then register your Mac for beta access.
- Once you sign up, you’ll get access to Feedback Assistant, Apple’s way of getting structured feedback from testers.
- Read through the list of known issues for macOS 27 before continuing.
- Some bugs are already documented, so it’s good to know about them beforehand to save you confusion down the line.
It is free to enroll, and it only takes a few minutes on your Mac or iPhone.
Step 2: Select the macOS 27 Beta in Software Update
- On your Mac, open System Settings, click General, then click Software Update from the list.
- Once your device is successfully enrolled, you should see the macOS 27 beta option available.
- Please carefully review the update details, especially storage requirements and estimated install time.
- Apple only presents software that is actually compatible with your specific device through Software Update.
- It reduces the risk of downloading a build intended for a different Mac model.
When you are happy with it, tap to begin the download and let it run its course.
Step 3: Keep the Installation Stable
Installation stability is as important as the download itself, so plan for a time window without interruptions.
- Stay on power. For the entire process, keep your Mac plugged into a charger, since a dead battery in the middle of the install causes issues.
- Use reliable internet. Avoid public Wi-Fi and ensure you have ample free storage space on your device before you begin.
- Don’t force it closed. Do not close the lid or force your device to shut down during the update.
- Expect multiple restarts. Your Mac might restart a couple of times during the installation process; this is completely normal behavior.
One of the most common causes of corrupted installations and lost files is the manual interruption of that process. This stage really pays off in patience, though the process can sometimes seem slower than you think it should.
What to Do If You Lose Data After Installing macOS 27 Beta
If documents, photos, videos, or project files vanish after the beta installation, don’t panic right away.
- Stop adding new data. Do not delete your disk, and avoid saving new files to the same drive while you investigate.
- Know the risk. New data can overwrite the very files you are trying to recover, worsening the situation.
- Check the obvious places first. Check Time Machine, iCloud Drive, your Desktop, the Documents and Downloads folders, and any external drives.
- Look again before assuming loss. Sometimes missing files are found when you look in the right place, especially if folders have been reorganized.
- Restore from backup if you can. If your Time Machine backup is up to date, it’s generally best to restore specific files from it.
If the files didn’t make it into a backup, the next practical option is dedicated Mac data recovery software.
When Backups Fall Short: 4DDiG Mac Data Recovery
Even the most careful users can find a backup gap when they least expect it. 4DDiG Mac Data Recovery can help recover lost files when a backup is unavailable or incomplete. It is meant to scan drives for files that become inaccessible after a system update, a crash, or an accidental deletion.
Among tools people search for as the best data recovery software Mac users can rely on, 4DDiG stands out for a few reasons:
- Broad file support. It supports the recovery of various file types, including documents, photos, videos, and audio.
- Flexible drive support. The software works with internal and external drives, as well as with formatted or corrupted storage devices.
- Format compatibility for Mac hard drive recovery. No advanced technical knowledge is required to scan both APFS- and HFS+-formatted volumes.
And that’s important, because most people with lost files are already under stress and short on patience.
How 4DDiG Mac Data Recovery Works
The tool follows a simple sequence so that most people can complete it in minutes.
- Install the software. Download and install 4DDiG on another working Mac rather than the affected drive.
- Select the source. Plug in the drive that held your missing files or select the affected internal volume directly from the app.
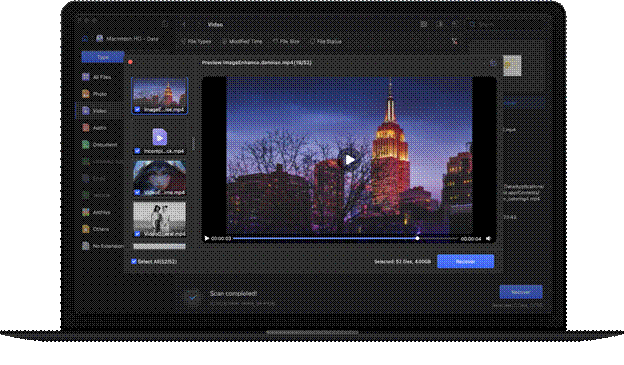
- Run the scan. Allow the software to scan the selected location for recoverable files.
- Preview the results. Make sure you have actually found the right files before you commit to recovering them.
- Choose a new destination. Save your recovered files onto another drive, not the original affected drive.
Saving the recovered data back to the same drive also risks overwriting other files that have not yet been scanned. The step-by-step flow makes the process approachable, even for someone who has never used Mac data recovery software.
How to Leave the macOS 27 Beta Safely
At some point, you may decide that the beta experience is not for you right now, and that is fine. Turning off future beta updates in Software Update does not automatically return your Mac to an earlier version of the system.
To step back down to a stable release:
- Know what disabling beta updates won’t do. It prevents future beta installs, but doesn’t roll back your current system.
- Find a compatible backup. You generally need one created before the beta was ever installed on your Mac.
- Expect to erase and reinstall. Restoring often involves wiping your Mac and reinstalling macOS from that previous backup point.
- Check the backup date. An Apple requirement is that any backup used for restoration must have been made before the beta was installed.
Having a pre-beta backup is crucial throughout the process because it provides a safety net in case something goes wrong. Planning your exit before you even start testing will leave you in a much better position later.
FAQs
1. Will installing macOS 27 beta erase my files?
A standard beta update generally preserves your files, but interruptions, low storage space, or system errors can occasionally make your data inaccessible. The best precaution you can take is to back up with Time Machine before installing.
2. What should I do if the macOS 27 beta installation gets stuck?
Wait at least an hour before you do anything. If you interrupt the process too soon, it can corrupt the whole system. If your Mac still doesn’t start up, use macOS Recovery to diagnose the problem without erasing your drive.
3. Can 4DDiG recover files lost after a macOS 27 beta installation?
Yes, 4DDiG scans for locally stored files that have become inaccessible after the beta update process. The affected drive should be unplugged immediately, and the data scanned as soon as possible before new data overwrites anything.
4. Can I downgrade from macOS 27 beta back to the previous version?
Yes, though it is not a simple one-click process by any measure. You would need to wipe your Mac and restore from a Time Machine backup made before the beta was installed.
5. Is macOS 27 beta free to install?
Yes, Apple’s public beta program is free for eligible users with a compatible Mac and an active Apple Account. Developer beta access may have different enrollment requirements depending on your account type.
Final Thoughts:
Trying macOS 27 Golden Gate early can be a really fun way to try out new Apple Intelligence features before anyone else. That said, beta software always carries some risk, and your files deserve real protection throughout the process. A good Time Machine backup, a copy of your priority files, and a clear rollback plan will cover most situations.
In the event something goes wrong, Mac hard drive recovery tools like 4DDiG offer a practical second layer of protection. Integrate backup preparation into the installation process, not as some optional extra step you might skip. If you take the proper precautions, you can enjoy testing macOS 27 without losing any sleep over your data.
